Network Upgrade with Ubiquiti!!! (Video) (Posted Aug 16, 2024)
VIDEO – https://www.youtube.com/watch?v=PIapByJDWn4
I completed a major upgrade to my network moving from a Netgear Wi-Fi/Router combo to a fully managed network. There is a big difference!!!
This video will show you what I built, how I built it, and the strategy of the implementation. May hosts are now hard lined in the house other than mobile devices. The creation of the network was a great thing to do which implements IP addressing, VLANs, Trunk Ports, and firewall rules.
Below is additional information on this project.
RACK – MDF
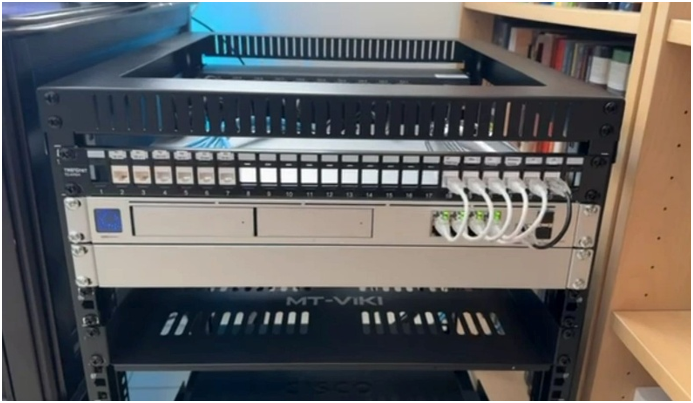
The rack is a 12U which has my main components on the top, then on the bottom is labbing equipment (labbing equipment not shown here, can view in video). I installed the UDM-PRO-MAX as the main driver. Some things that I really like about Ubiquiti is the price (no subscriptions), user interface, and the other products that can be purchased to work with Ubiquiti too (cameras, AP’s, etc.). There is a great deal of things that I can do with this unit to include managing network, security cameras,
Further upgrades will involve a UPS, storage device (Synology), server, and probably an improved firewall.
SWITCH 2 – IDF
This is my “big switch” which is actually not in my rack at this point, but in my entertainment center. This is the 16 port Pro-Max Switch with etherlighting. It is not needed but I have a trunk port connecting the router and this switch supplying internet. I also have most of these on an IoT network because my Playstation, and especially my TV, have no need to be on my main network.
I plan to upgrade my camera system to IP cameras and move away from Wi-Fi cameras, but one step at a time. I am inclined to also use the Ubiquiti cameras when that time comes because of how streamlined it works with UDM-PRO-MAX.
SWITCH 3
This managed Netgear switch is right next to my desk. Port 8 is a trunk port to the router and the 3 ports next to it are connecting to the main/trusted network. The first 4 ports are for the guest network that I can use on troubleshooting device that are not my own or also my work laptop as well which does not need to be on my main network. The cable connect to the side of my desk is really quick and easy to link up with quick ethernet.
DOCUMENTATION
In my video I cover the this network’s documentation at the 14:10 minute mark. While making networks are great and fun, part of the labor writing down what was done in order to know how to further grow it strategically, but also more importantly how to troubleshoot issues. This is just a small network and troubleshooting can be relatively easy, this documentation represents an ideal model for what documentation should be on a large network for more complex issues on more intricate networks.


You May Also Like
The Daily Drill, the Daily Thrill! (Posted Feb 26, 2024)

Making An Impression! (Posted Oct 10, 2023)